Growing Mushrooms: Your Complete Guide to Cultivating Oyster Mushrooms Indoors
If you’re looking to add a unique touch to your culinary creations, growing mushrooms at home is an exciting and rewarding venture. Among the many varieties of mushrooms, oyster mushrooms stand out as one of the easiest to cultivate. They grow quickly, require minimal space, and can thrive indoors, making them perfect for anyone, regardless of gardening experience. In this guide, we’ll take you through the step-by-step process of growing your own oyster mushrooms, ensuring you have everything you need to succeed.
Why Choose Oyster Mushrooms?
Oyster mushrooms are not only delicious but also packed with nutrients. They’re low in calories and fat, high in fiber, and rich in potassium and selenium. This makes them a healthy addition to your diet. Their quick growth cycle means you won’t have to wait long to enjoy your harvest. Plus, they can be grown indoors where light and temperature conditions are easier to manage.
What You’ll Need to Start Growing Mushrooms
Before diving into the process of growing mushrooms, gather the necessary materials:
- Straw: Wheat straw works best for oyster mushrooms.
- Plastic Bags: Medium or large robust plastic bags will do.
- Mushroom Spawn: You can purchase oyster mushroom spawn online or find a local supplier.
- Spray Bottle: To keep the environment moist.
- Water: For pasteurization and maintaining humidity.
Preparation: Ensuring a Clean Start
Before you begin the cultivation process, hygiene is paramount. Wash your hands thoroughly and clean all surfaces. This step is crucial to prevent the growth of unwanted fungi.
Step 1: Pasteurizing the Straw
The first major step in growing mushrooms is to pasteurize the straw. This involves heating the straw in water to about 70-75°C (158-167°F) for 45-60 minutes. This process effectively kills harmful bacteria that could interfere with mushroom growth.
Before placing the straw in the pot, cut it into small pieces, roughly 1 to 3 inches long. After pasteurization, use tongs to remove the straw from the pot and let it cool in a clean tub. It’s essential not to add the mushroom spawn until the straw has cooled to room temperature, as heat can kill the spawn.
Step 2: Packing the Bags
Once the straw has cooled, tightly pack it into the plastic bags. Distribute the mushroom spawn throughout the straw, placing about three or four pieces of spawn-covered dowel in each bag. The straw should be damp but not dripping wet from the pasteurization.
Step 3: Creating Air Holes
To allow for air exchange, sterilize a skewer or nail by pouring boiling water over it and jab holes into the bags every 3-4 inches. This will help maintain a suitable environment for growth while preventing contamination. Seal the mouth of the bag with a rubber band or thread.
Step 4: Finding the Right Environment
Your mushrooms need a suitable home to thrive. Place the bags in a location away from direct sunlight but with some indirect light. The ideal temperature for growing oyster mushrooms is around 15-20°C (59-68°F). Now, it’s time to wait while the mushroom spawn develops into mycelium.
Mycelium is the white, fuzzy network that will take over the straw. You should start seeing it develop within the first couple of weeks. Keep the bags moist, spraying with water as necessary, but ensure they do not become overly wet.
Step 5: Watching Your Mushrooms Grow
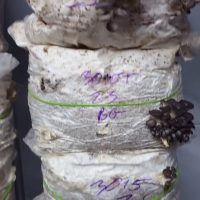
Approximately four weeks after inoculation, the mycelium should have spread throughout the straw, and you may begin to see the formation of mushrooms. If necessary, cut larger holes in the bag to allow the mushrooms to escape. They typically grow in clusters, and you can expect to see significant growth within a week.
During this time, mist the mushrooms two to three times a day to keep them moist. They will double in size daily, so be prepared for a beautiful bounty!
Harvesting Your Mushrooms
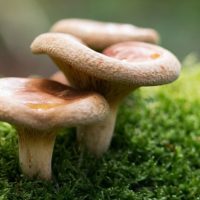
Harvesting is the most exciting part! Your mushrooms are ready when the rims are still curled over and pointing downwards. If they start to turn upwards, it’s time to pick them. To harvest, twist the mushrooms at the base to ensure you leave the bottom part in the bag, which is essential for subsequent flushes of mushrooms.
With proper care, you can expect three to four flushes of mushrooms from the same bag. After the bags stop producing, the leftover straw can be used as mulch in your garden, or you can use some of it to start new bags for another round of growing.
Final Thoughts
Growing mushrooms is a fantastic way to engage with nature and enjoy fresh produce right from your home. It’s a journey of patience and care, but the reward of homegrown oyster mushrooms is well worth the effort. If you have any tips or experiences with growing mushrooms, feel free to share them in the comments below!
So, what are you waiting for? Grab your supplies and start your mushroom-growing adventure today!


Pingback: How to grow a Ton of Mushrooms even if you have no garden. - Mushroom Mob